Tuesday, September 12, 2017

Windows Server Shortcut Commands

Shortcut commands and keys always help to work on a system in a professional manner. Sometimes it may be irritating to navigate through a long path to access a service, program, or tool. In this post, we have listed the most common shortcut commands to manage a Windows system. Following are some of the most common Shortcut Commands to manage a Windows system especially a Windows Server such as Windows Server 2012/2016. We recommend to trying to execute each of them. If you get stuck anywhere, please drop your queries in the comment box.
  1. AdRmsAdmin.msc : To open the Active Directory Rights Management Services console.
  2. Dsac.msc : To open the Active Directory Administration Center console.
  3. Domain.msc : To open the Active Directory Domains and Trust console.
  4. Dsa.msc : To open the Active Directory Users and Computers console.
  5. Dssite.msc : To open the Active Directory Site and Services console.
  6. Certsrv.msc : To pen the Active Directory Certificate Services console.
  7. Dfsmgmt.msc : To open the DFS Management console.
  8. Dhcpmgmt.msc : To open the DHCP Management console.
  9. Diskmgmt.msc : To open the Disk Management console.
  10. Dnsmgmt.msc : To open the DNS Management console.
  11. Compmgmt.msc : To open the Computer Management console.
  12. Devmgmt.msc : To open the Device Manager console.
  13. Nfsmgmt.msc : To open the Services for Network File System management console.
  14. Printmanagement.msc : To open the Print Management console.
  15. Fsmgmt.msc : To open the Shared Folders console.
  16. Virtmgmt.msc : To open the Hyper-V Manager console.
  17. Wdsmgmt.msc : To open the Windows Deployment Services console.
  18. Eventvwr.msc : To open the Event Viewer console.
  19. Gpmc.msc : To open the Group Policy Management console.
  20. Gpme.msc : To open the Group Policy Management Editor console.
  21. Rsop.msc : To open the Resultant Set of Policy console.
  22. Gpedit.msc : To open the Local Group Policy Editor console.
  23. Secpol.msc: To open the Local Security Policy management console.
  24. Certmgr.msc : To open the Certificates Manager console.
  25. Fsrm.msc : To open the File Server Resource Manager console.
  26. Lusrmgr.msc : To open the Local Users and Groups management console.
  27. Perfmon.msc : To open the Performance Monitor console.
  28. Services.msc : To open the Services console.
  29. Taskschd.msc : To open the Task Scheduler tool.
  30. Tpm.msc: To open the TPM Management console.
  31. Wbadmin.msc: To open the Windows Server Backup console.
  32. Cleanmgr.msc: To open the Disk Cleanup utility.
  33. Wf.msc : To open the Windows Firewall and Advanced Security console.
  34. Msinfo32 : To open the System Information window.
  35. Msconfig : To open the System Configuration window.
  36. Iscsicpl : To open the iSCSI Initiator console.
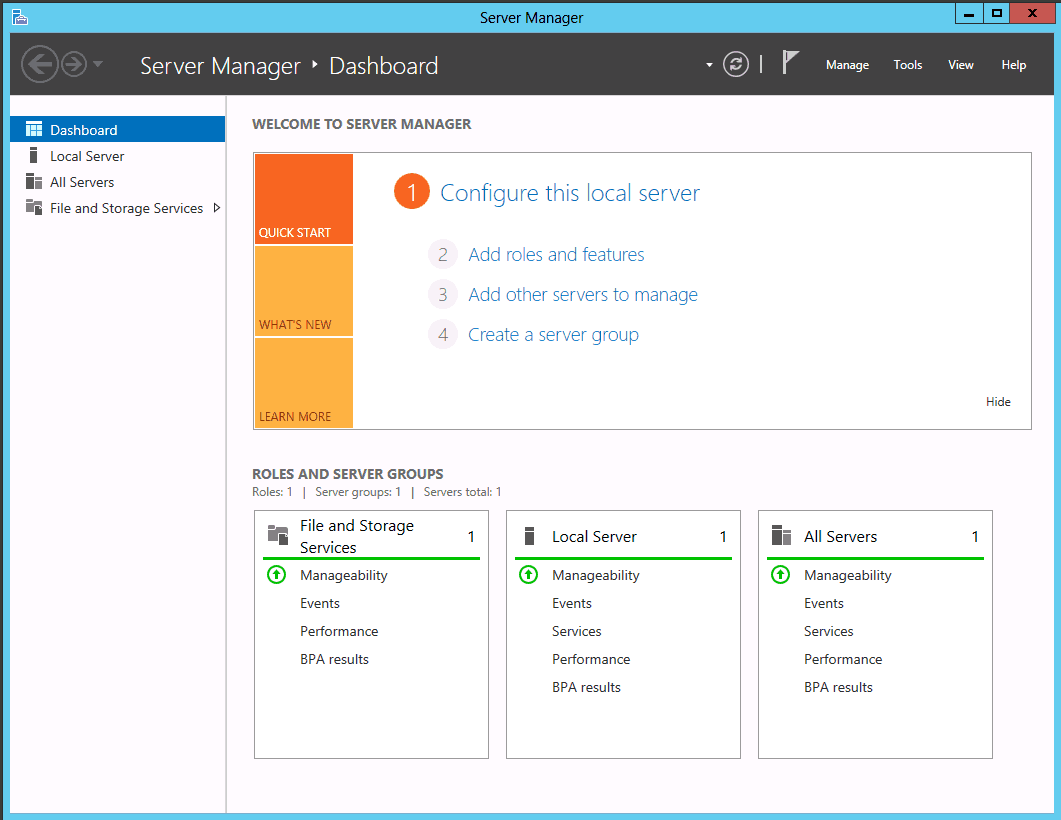
  37. ServerManager : To open the Server Manager console.
  38. Systeminfo : To view the System Information.
  39. Sysdm.cpl : To open the System Properties dialog box.
  40. Ncpa.cpl : To open the Network Connections window.
  41. Inetcpl.cpl : To open Internet Explorer Properties options.
Windows operating systems are not case sensitive like the Linux and Unix system. Hence, executing commands in capital letters or small letter will not affect the result.
Hope this post helped you and you enjoyed it. Do share the article. You may also provide suggestions to add any other commands that you think we have missed.
Monday, September 11, 2017

How to demote a Domain Controller (DC) in Windows Server 2012 Active Directory Domain Services (AD DS)

How to demote a Domain Controller (DC) in Windows Server 2012 Active Directory Domain Services (AD DS)

In this blog we will explore how to demote a domain controller in Windows Server 2012 Active Directory Domain Services (AD DS).
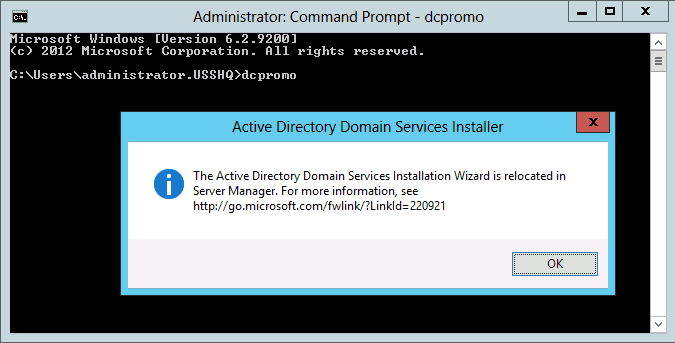
In previous versions of Windows Server to demote a domain controller you would use the DCPROMO.exe utility.  In Windows Sever 2012 the DCPROMO utility has been deprecated.

In Windows Server 2012 we will use Server Manager or PowerShell to demote the DC.  In this blog I will be using the GUI to demote the server manager. So let’s get started.

To demote a DC from AD DS complete the following steps:

Use Server Manager to remove the Active Directory Domain Services Role.
Launch Server Manager, select the Manage drop down menu, select Remove roles and features.

  1. Review the Before You Begin page, Click Next.
  2. On the Select installation type page ensure Role-based or feature-based installation radial button is selected, click Next.
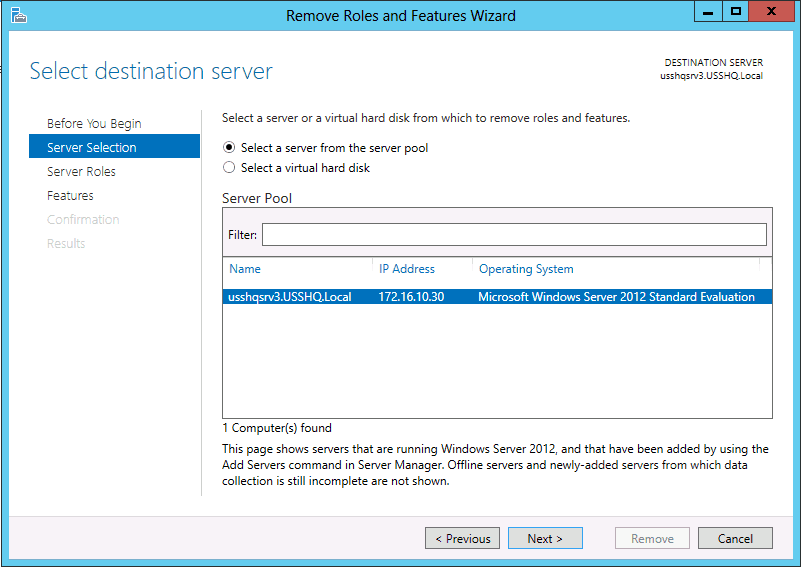
  3. On the Select destination server page Select the desired server from the Server Pool.

Note:  The 2012 Server Manager allows roles and features to be installed remotely.
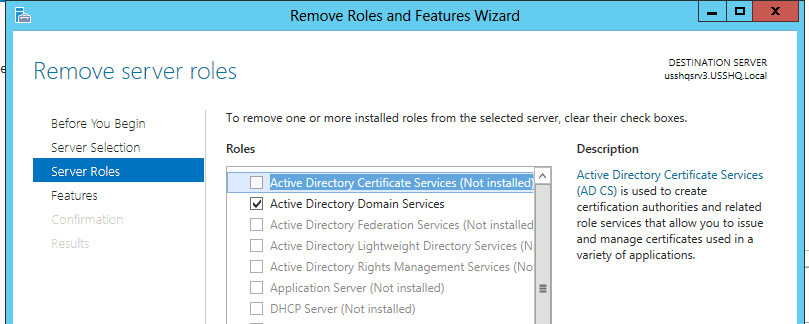
  1. On the Remove Roles and Features Wizard, click on the Active Directory Domain Services box to remove the check box.


  1. The Remove Roles and Features dialog box Remove features that require Active Directory Domain Service pops up, select Remove Features.
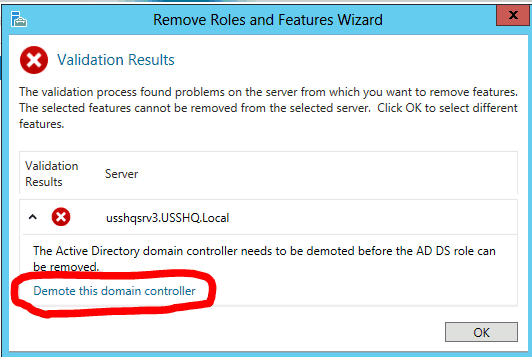
  2. On the Remove Roles and Features Wizard dialog box Validation Results box will appearThe domain controller must be demoted before continuing.  Click on Demote this domain controller.

  1. On the Active Directory Domain Services Configuration Wizard enter the required credentials to demote this server, click Next.
Note:  To demote replica domain controller you must be at the least a Domain Admin to remove an entire domain from the forest or to demote the last DC of a Forest you must provide Enterprise Admin credentials.
Note:  Only select Force the removal of this domain controller if the DC and not communicate with the remaining DCs.


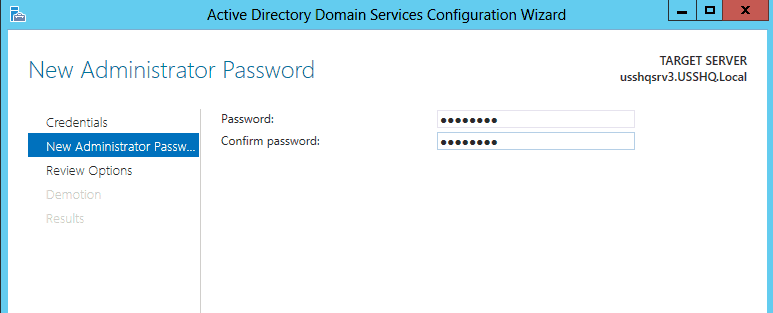
  1. On the New Administrator Password, enter and confirm the new local administrator account password, click Next.

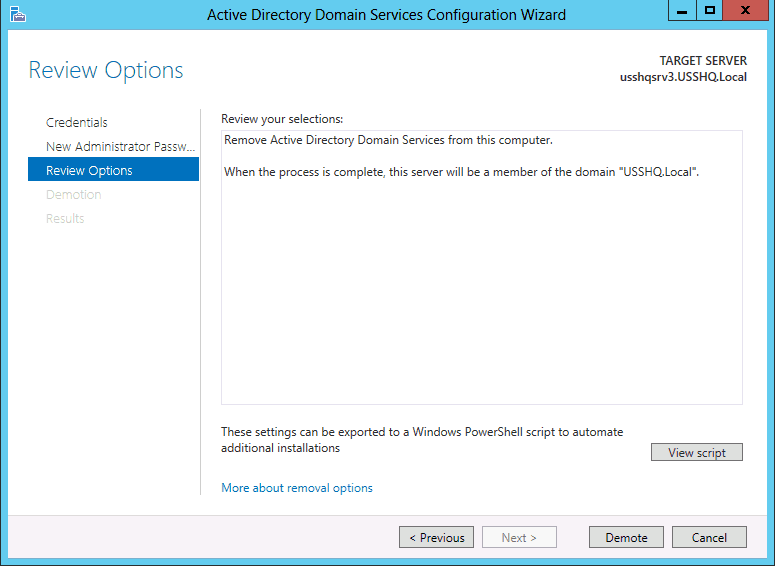
  1. On the Review Options verify the information is correct and click Demote.

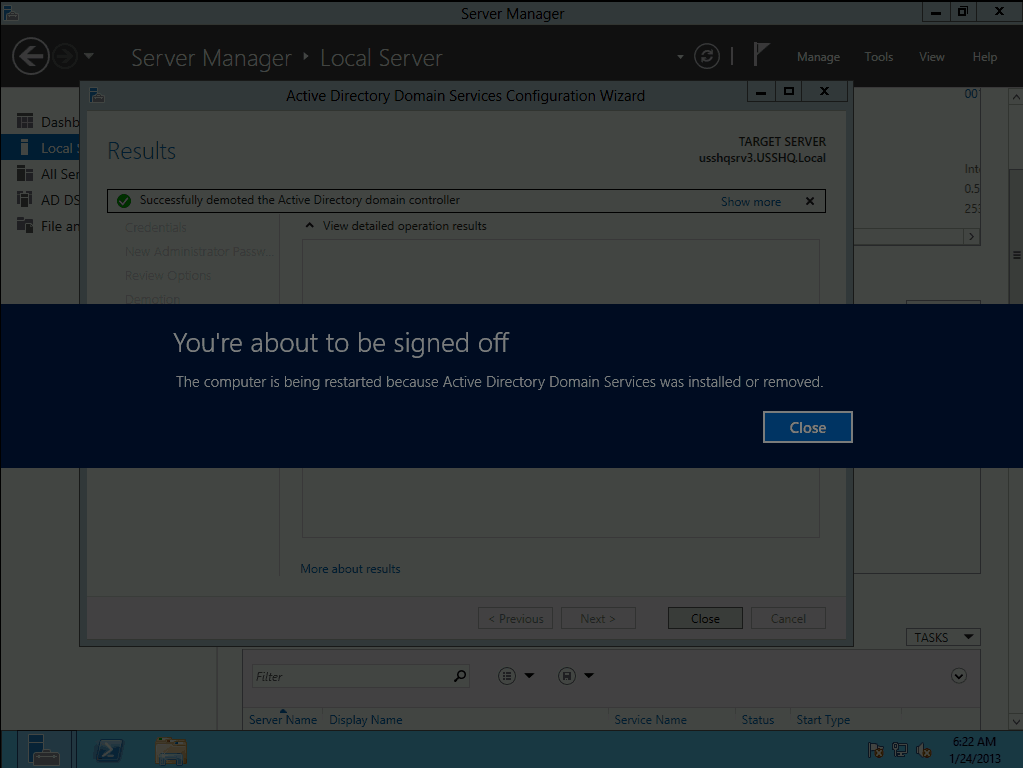
This will begin the demotion process.  To finish the demotion the server will automatically restart.

Note:  When the server restarts it will be a member of the domain that is was previously a domain controller in.
Note:  The Binaries for AD DS are still installed on the server.  If this server is not going to be promoted back to a domain controller in the future rerun the Remove Roles and Features Wizard to remove the AD DS Role from the server.

Verifying the Removal of AD DS

  1. Logon to the server hosting the DNS service for the domain using the Administrator account credentials.
  2. Launch the DNS console and verify the deletion of Service Records for the removed domain controller.
Active Directory Domain Services is now been removed from this server.
Until then, RIDE SAFE!

Steps to Install Hyper-V on VMware

Steps to Install Hyper-V on VMware

In order to install Hyper-V on VMware Workstation, you need to perform the following steps:
  1. Ensure that the VMware virtual machine on which you want to install Hyper-V is powered off.
  2. Go to the directory where the virtual machine files are stored. Select and right-click VMware virtual machine configuration file (extension .VMX) and open with Notepad as shown in the following figure.Edit Virtual machine configuration file to install Hyper-V on VMware
  3. In the VMX configuration file, type the following code at the end of the file
hypervisor.cpuid.v0 = "FALSE"
mce.enable = "TRUE"
vhu.enable = "TRUE"
Edit VMX configuration file
  1. Let’s have look at each of preceding options:
  • hypervisor.cpuid.v0 = “FALSE”: The value “FALSE” will tell the Windows operating system such as Windows 10 or Windows Server 2012/16 that it is not running on a virtualized platform.
  • mce.enable = “TRUE”: MCE stands for Machine Check Exception that allows the Windows VM to report CPU hardware issues.
  • vhu.enable = “TRUE”: The value “TRUE” will enable the nested virtualization for this VM.
  1. Now save the VMX file and open the VMware Workstation tool. Open the Virtual Machine Settings window of the VM inside which you want to install Hyper-V.
  2. Under the Hardware tab, select Processors in the left pane. In the right pane, select the Virtualize Intel VT-x/EPT or AMD-V/RVI and Virtualize CPU performance counters check boxes and then click OK.Modify vm settings to install Hyper-V on VMware
  3. Power on the virtual machine, depending on the Windows operating system you are using, follow one of following options to install Hyper-V.
  4. For Windows8/8.1/10 operating systems, open the Program and Features option in the control panel and select the Hyper-V check box to install it.Install Hyper-V on Windows 10
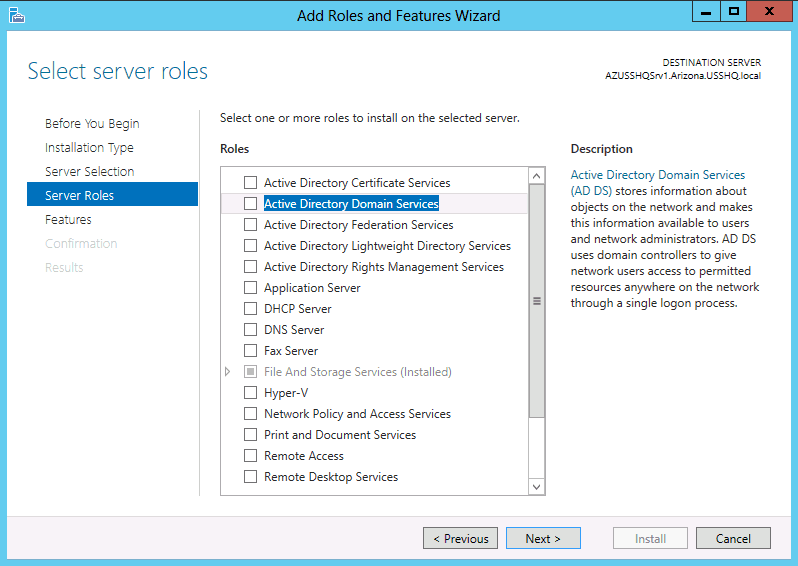
  5. For Windows Server 2008/2012/R2/2016 operating systems, open the Server Manager tool, use Add role and features link to install Hyper-V on a virtual machine.Install Hyper-V on Windows Server 2012
  6. The next process will remain straightforward, just following the on-screen instructions to install the Hyper-V on VMware Workstation.
In this post, we have explained how to install Hyper-V on VMware Workstation or VMware Player.

How to Share Files Between Host and Guest in VMware

How to Share Files Between Host and Guest in VMware

Many IT professionals perform their lab exercises using VMware Workstation or Player. They want to share files between host and guest in VMware to perform few lab exercises. There are two methods that allow you to access files from a host machine to virtual machine running on VMware. The first method is drag-and-drop and the second one is using the Shared Folders feature. The Shared Folders feature allows you to share files between virtual machines and the host system. Before configuring the Shared Folders feature for a virtual machine, you need to make sure the following prerequisites:
  • You have installed the latest version of VMware Tools in the guest operating system.
  • You have sufficient permission on the host system to allow access to files in the shared folders.
In this post, we will explain how to share and access files from the host machine to a virtual machine running on VMware Workstation or VMware Plyer. For this, we will use the Shared Folders feature. We assume that you have already downloaded and installed VMware Workstation or VMware Player and have a running virtual machine.
Download Latest Version of VMware Workstation Player
To share files between host and guest machine in VMware, you need to perform the following steps:
  1. Select your virtual machine for which you want to share files. Wait a minute! Which platform are you using: VMware Workstation or Player? For VMware Player, click Player, select Manage and then select Virtual Machine Settings  to open the settings options for this VM. For VMware Workstation, click Edi virtual machine settings in the right pane to open the settings options for the selected VM. We use VMware Workstation in this article.Enable share folders in VMware
  2. On the Virtual Machine Settings window, select the Options tab, and then select Shared Folders.
  3. In the Folder sharing section in the right pane, you can select either of the following Shared Folders options:
  • Always enabled: Select this option to keep folder sharing enabled permanently, even when the virtual machine is shut down, suspended, or powered off.
  • Enabled until next power off or suspend: Enable folder sharing temporarily.
  1. Select the Always enabled radio button. If you want to map shared folder as a network drive, select the Map as a network drive in Windows guests check box and then click Add.Enable folder sharing between host and guest on VMware
  2. Needless to say but will have to say, on the welcome page, click Next.
  3. On the Name and Shared Folder page, click Browse, select the folder of your host machine that you want to share, in this case, H:\Virtual Data, and then click Next.Select folder that you want to share
  4. On the Shared Folders Attributes page, ensure that the Enable this share check box is selected, and then click Finish.Share files between host and guest in VMware
  5. On the Virtual Machine Settings window, verify that the shared folder is listed in the Folders section, and then click OK.
  6. Sign in to your virtual machine, open the File Explorer window and verify that your shared folder displays as a network drive. Alternatively, you can also type \\vmware-host in the Run dialog box to access shared folder. Use the shared folder and files as you wish on the VMware virtual machine.
  7. If you no longer want to enable sharing between host and guest machines, you can disable it anytime. To disable the sharing, remove the Shared Folders check box on the Virtual Machine Settings window.
In this post, we have explained how to share files between host and guest on VMwar

How to Install Windows Server 2016 on VMware Workstation

How to Install Windows Server 2016 on VMware Workstation

In the previous post, we have introduced Windows Server 2016 and the new features that have been added to Windows Server 2016. Please visit the following links and have a quick look to review these features. In this post, we will demonstrate a step by step guide to install Windows Server 2016 on VMware Workstation or Player. We assume that you have already downloaded the latest Windows Server 2016 Technical Preview ISO image file.
Before installing Windows Server 2016, ensure that your system meets the minimum system requirements. Click here to check the system requirements for Windows Server 2016.

Installing Windows Server 2016

To install Windows Server 2016 on VMware Workstation using ISO image, you need to perform the following steps:
  1. Make sure that you have installed the latest version of VMware Workstation or VMware Workstation Player and the VMware console is active.
  2. On the VMware console, select File and then select New Virtual Machine to create a new virtual machine.
  3. On the New Virtual Machine Wizard, click Next.
  4. On the Guest Operating System Installation page, select the Installer disc image file (iso): radio button.
  5. Browse the location of the Windows Server 2016 ISO image file and then click Next.Install Windows Server 2016 on VMware from ISO
Note: If you use the VMware platform that automatically detects the version of the Windows server, you may be asked to set the product key, operating system edition, and the Administrator account’s password.
  1. On the Select a Guest Operating System page, select the Windows Server 2016. If Windows Server 2016 is not listed (if you use an older version of VMware Workstation), select the highest supported version of Windows server, and then click Next.Select Windows Server 2016 guest operating system in VMware Workstation
  2. On the Name and Virtual Machine page, specify the name of the virtual machine in the Virtual machine name field. In the Location field, navigate the location where you want to save the virtual machine and then click Next.Specify the name of virtual machine and location in VMware
  3. On the Specify Disk Capacity page, select Store virtual disk as a single file, optionally you can also set the disk size as well. 50 GB disk space would be enough for the testing purpose. Click Next.
  4. On the Ready to Create Virtual Machine page, click Finish and close the Virtual Machine Settings window.
  5. Power on the virtual machine. The Windows Setup page should be displayed. Press any if the Press any key to boot message appears. Click Next, and then click Install Now.click install now to Install Windows Server 2016 on VMware
  6. On the Select the operating system you want to install page, select the Windows Server 2016 Desktop Experience, and then click Next.Select Windows Server 2016 edition
  7. On the License terms page, select the I accept the license terms check box and navigate to the Which type of installation do you want page. Since we are going to perform the clean installation of Windows Server 2016, select the Custom option, and then click Next.
  8. On the Where do you want to install Windows page, click Next. The installation process will begin, after 10-15 minutes the Customize settings screen will display.
  9. Set the desired password for the Administrator account and sign in to your Windows Server 2016 virtual machine.Windows Server 2016 Desktop screen
That’s all you need to do to install Windows Server 2016 on VMware platform. Drop your queries in the comment box, if you have something to say us. Do share the article.

Configuring VMware Network Connections Types

The virtual networking components in VMware Workstation and Player include the virtual switches, virtual network adapters, virtual DHCP server, and NAT device. You can configure any of the following types of VMware network connections for a virtual machine:
  • Bridged
  • NAT
  • Host-only
  • Custom
Let’s understand and configure each of the VMware network connections in detail.

Bridged

It connects a virtual machine to a network by using the network adapter on the host system. If the host system is on a network, this option is often the easiest way to allow the virtual machine to access to the physical network as well as the Internet.
Recommended posts:
To configure the bridged networking between virtual machines and the host system, you need to perform the following steps:
  1. Select the virtual machine and open Virtual Machine Settings options.
  2. On the Virtual Machine Settings window, under the Hardware tab, select Network Adapter in the left pane, and then select the Bridged: Connected directly to the physical network.Configure Bridged network in VMware workstation
Note: If you use the virtual machine on a laptop, select the Replicate physical network connection state check box. This setting allows the IP address to be renewed when you move from one wired/wireless network to another.

NAT

In this option, the virtual machines get the IP address and other TCP/IP settings from the virtual DHCP server. This is the default selection for the all virtual machines in VMware Workstation. The following figure shows the NAT network connection in VMware Workstation.Configure NAT network connection in VMware workstation

Host-only

It creates a network that provides a network connection between the virtual machines and the host system by using a virtual network adapter.
To configure the host-only networking, you need to perform the following steps:
  1. On the Virtual Machine Settings window under the Hardware tab, select Network Adapter in the left pane.
  2. Select the Host-only: A private network shared with the host radio button and click OK to close the Virtual Machine Settings  as shown in the following figure.Configure VMware Network connections
The Custom and LAN segment are two other available options in VMware Workstation. The Custom option allows you to add the virtual machines in a specific virtual network. You can think a custom network as a separate virtual switch. The LAN segment allows you to create a separate LAN segment with the custom incoming and outgoing bandwidth. To set the desired bandwidth for a LAN segment in VMware Workstation, click Advanced and set the desired values as shown in the following figure. Create a LAN segment in VMware
Note: Some of the VMware network connections may diifer depending on the version of VMware Workstaion/Plyaer being used.

Adding a Virtual Network Adapter

When you create a new virtual machine, a virtual network adapter for the virtual machine is automatically created. If it is not added automatically or removed accidently, you can add a new virtual adapter to a guest operating system at any time.
To add a virtual network adapter to a virtual machine in VMware Workstation or Player, you need to perform the following steps:
  1. On the Virtual Machine Settings window under the Hardware tab, click Add.
  2. On the Hardware Type page, select Network Adapter, and then click Next.
  3. On the Network Adapter Type page, select any of the Network connection, such as Host-only, and then click Finish.Add a virtual network adapter in VMware Workstation
That’s all you need to understand and configure VMware network connections. We hope you found this article useful for you.

Configure File History in Windows 10 – Step by Step Guide

Configure File History in Windows 10 – Step by Step Guide

File history is a feature of Window operating systems that allows you to take backup of network files and helps to recover these files if something goes wrong. It works much like the same way as the Shadow Copy feature works. To configure the File History feature in Windows 10, you need either a USB media or a network drive where you will save the file history data. If you are using a virtualized platform such as VMware Workstation or VirtualBox, you can use the Shared Folder feature to configure File History.
Alos read the following articles:
The Shared Folder feature allows you to share the host system’s data with the virtual machines. In addition, Shared Folder can also be mapped as a network drive in the virtual machines. This network drive can be used to save the file history data. In this post, we will use VMware’s Shared Folder feature to configure File History inside Windows 10 virtual machine.
To configure File History in Windows 10, you need to perform the following steps:
  1. Open the Virtual Machine Settings, click Options, and then select Shared Folders in the left pane. In the right pane, select the Always enabled radio button, and then click Add, as shown in the following figure.Configure file history in Windows 10
  2. On the welcome page of the Add Share Folder Wizard, click Next. On the Name the Shared Folder page, click Browse, select the folder of the local host machine that you want to share. For example, C:\Users\Public. It will be used to store the file history backup data.File history in Windows 10
  3. Click Next and then click Finish to close the Add Shared Folder Wizard. Close the Virtual Machine Settings.
  4. On your Windows 10 system, open File Explorer, and create some test files for the testing purpose.

Enable File History in Windows 10

  1. To enable the File History feature, open the SETTINGS window, and select Update & security. On the UPDATE & SECURITY window, select Backup and then click More options .
  2. On the BACKUP OPTIONS screen, click See advanced settings, as shown in the following figure.More options in file history
  3. On the File History window, click Select a network location. On the Select
  4. drive window, click Add network location.Select network drive for file history
  5. In the Folder text box of the Select Folder window, type \\vmware-host\Shared Folders\<shared folder name> and click Shared Folder.select folder
  6. On the Select Drive window, ensure that your network location is added, and then click OK.Select file history drive
  7. On the File History window, you can see that the Turn on option is now highlighted. Click Turn on.turn on file history
  8. Wait until the File History is on message appears and then click Run now.Run now file history
  9. Wait for a few seconds and close all the active windows. Navigate to the Documents folder and delete the files that you have created previously. Also, empty the Recycle Bin.

Recovering Deleted Files Using File History

To recover deleted files using the File History feature, you need to perform the following steps:
  1. Press the Start button, type file history in the search box, and then select Restore your files with File History, as shown in the following figure.restore files using file history
  2. On the Home – File History window, double-click the Documents. On the Document – File History window, select your deleted files, in this case, Text File1 and Text File2 and then click Restore button to recover the deleted files.recover files using file hitory in Windows 10
  3. Navigate to the Documents folder and verify that your files are recovered.
That’s all you need to configure File History in Windows 10 and recover files using this feature. If got stuck anywhere don’t hesitate to share your issues. Just drop your queries in the comment box, we will catch you soon.

How To Connect USB Devices To VMware Virtual Machines

VMware Workstation and VMware Player allow you to connect the removable devices, such as USB drives and USB printers to a virtual machine. However, in the case of USB printer, you also need to enable virtual printing for the virtual machine. When you connect a USB device to a VMware virtual machine, you can use it in the same way as you use in a physical system. However, a USB device can be connected either to the physical system or to the virtual machine at a time. You can customize the settings for a removable device, for this, you need to change the virtual machine settings. Before customizing the removable device settings, ensure that the virtual machine, to which you want to connect the USB device, is powered on. In this post, we will explain how to connect USB devices to VMware virtual machines.

Steps to Connect USB Devices to VMware Virtual Machines

To connect USB devices to VMware virtual machines, you need to perform the following steps:
  1. On the VMware Player console, click Player (click VM, if you are using VMware Workstation) and select Removable Devices. In the removable device options, select the device that you want to connect, such as USB Pendrive, and then select Connect. The following figure shows how to connect USB Device to VMware Virtual Machines.connect removable device to VMware Virtual Machine
  2. Once the USB device is connected to a VMware virtual machine, it should be displayed inside the virtual machine. Use it as you wish. The figure shows that a USB drive is connected to the VMware virtual machine.How to connect USB Devices to VMware Virtual Machines

Disconnecting USB Devices

  1. To disconnect the USB device, select the virtual machine, click Player (VM) and select Removable Devices. Select the device that you want to disconnect and then select Disconnect.
  2. Now, the device is free to use on the host machine.
Want to learn more? Let’s start to share files between host and guest systems.
That’s all you need to do to connect and disconnect USB device in VMware Virtual machines.

How To Install Windows 10 on VirtualBox

How To Install Windows 10 on VirtualBox

In the previous posts, we have explained a lot about the VirtualBox. In this post, we will explain how to install Windows 10 in VirtualBox. This is the fourth article of the Getting Started With VirtualBox step by step guide that contains the following step by step tutorials:
  1. Downloading the latest version of VirtualBox.
  2. Creating a new virtual machine in VirtualBox.
  3. Understanding and configuring virtual machine settings in VirtualBox.
  4. Installing a guest operating system in VirtualBox (this post).
  5. Working with snapshots in VirtualBox.
  6. Installing VirtualBox Extension Pack.
  7. Encrypting a virtual machine in VirtualBox.
  8. Creating a clone virtual machine in VirtualBox.

Installing Guest OS in VirtualBox

VirtualBox supports a wide range of guest operating systems. However, in this post, we will focus on installing Windows 10 on VirtualBox. Installing Windows 10 on VirtualBox is almost similar as we install it on the other virtualization platforms such as Hyper-V and VMware Workstation/Player. To install Windows 10 on VirtualBox, you need to perform the following steps:
Since in the previous post, we have already created a new virtual machine in VirtualBox, hence we will continue to use the same virtual machine for this post. To install Windows 10 on VirtualBox, you need to perform the following steps:
  1. First of all, you need the installation media (DVD or ISO) of the guest operating system that you want to install on VirtualB0ox. In this case, Windows 10. The most comfortable installation media is ISO. The following figure shows the Windows 10 VM.Install Windows 10 on VirtualBox
  2. To use an ISO image file as an installation source media, click Devices and navigate to Choose disk image option in the VirtualBox VM console. Browse and select the desired ISO image (Windows 10) that you want to use as an installation source.Using ISO image in VirtualBox
  3. You may need to reset the virtual machine to restart it if the booting failed message appears. Once the virtual machine has reset, the Windows Setup screen will be displayed.Installing Windows 10 in Virtual Machine VirtualBox
The installation process is pretty straightforward, just follow the on-screen instructions and complete the installation. However, if you are new to the Windows 10 installation. We have explained all the steps in detail. Keep continue to follow the steps.
  1. On the next Windows Setup screen, click Install Now to proceed.
  2. On the Activate Windows screen, either type the product key if you have or click I don’t have a product key to continue with the evaluation version.Windows 10 product key
  3. On the next screen, select the desired edition of the Windows 10 operating system and click Next to proceed.Selecting Windows 10 edition
  4. On the License terms page, you know what should you do. Accept the license terms and click Next to proceed.
  5. On the next screen, there are two options: Upgrade and Custom.
    • Upgrade: Select the Upgrade option if you have an earlier version of Windows OS such as Windows 7 or 8 to want to upgrade to Windows 10.
    • Custom: For the clean and fresh installation, select the Custom option and proceed to next.Windows 10 Clean installation
  6. On the disk partition screen, select an existing partition or create a new one and then click Next to proceed.
  7. The installation process starts. It may take 10-15 minutes depending on your system performance. After some time the Get going fast screen Click Use express settings to proceed.Use express settings in windows 10
  8. On the next screen, fill the required details to create a user account. Click Next to proceed.create an account Windows 10
  9. After some time, the Desktop screen displays. Thus completes the installation process of Windows 10 in VirtualBox. Keep continue to use your Windows 10 virtual machine or power off it to perform the next exercise.Windows 10 desktop screen
In this post, we have explained a step by step guide to install Windows 10 in VirtualBox. We will use this virtual machine to explain the next step by step tutorials. Stay connected to learn more!

Configuring Virtual Machine Settings in VirtualBox

There are various setting options in VirtualBox that can be used to customize and tune a virtual machine. Here, we will cover up all the VirtualBox virtual machine settings options one by one. As you know, this is the third article of our Getting Started With VirtualBox step by step guide. In case if you missed the previous posts, we recommend you to read those posts, so you can understand the setup we are using.
The complete Getting Started With VirtualBox guide contains the following topics:
  1. Downloading the latest version of VirtualBox.
  2. Creating a new virtual machine in VirtualBox.
  3. Understanding and configuring virtual machine settings in VirtualBox (This post).
  4. Installing a guest operating system in VirtualBox.
  5. Working with snapshots in VirtualBox.
  6. Installing VirtualBox Extension Pack.
  7. Encrypting a virtual machine in VirtualBox.
  8. Creating a clone virtual machine in VirtualBox.
To configure the various Virtual Machine Settings in VirtualBox, we will perform the following step by step tasks:

Configuring General Settings in VirtualBox VM

  1. First of all, open the Settings window for the desired virtual machine. To open the virtual machine settings in VirtualBox, select the virtual machine and then click Settings.
  2. On the Settings window, the first section is the General The General section has four additional tabs that allow you to set the various settings. The Basic tab allows you to specify the virtual machine name, vendor type, and the version of guest OS.selecting guest os in virtualbox
  3. The next tab is the Advanced It allows you to specify the snapshot folder location and drag-and-drop option between the host and guest machines.Selecting snapshot location in VirtualBox
  4. The next tab is the Description tab that is self-explanatory.
  5. The next tab is the Encryption tab. It is almost similar to the BitLocker feature of Windows. It allows you to encrypt a VirtualBox virtual machine. We will cover this feature in the later section.Encrypting virtual machine in virtualbox

Configuring System Settings in VirtualBox

  1. Now comes to the System section. The first tab of the System section is Motherboard. Two of the major settings in this section are Base memory and Boot order. The boot order option is important as it allows you set the desired boot option through which the installation of the guest operating system will be done. For now, select the Optical option and move it to one step up.configuring boot order in virtualbox
  2. Next, select the Processor tab. Here, you can set the number of virtual CPUs for the selected VM and enable the NX bit (something that enforces to enable DEP on Windows systems).Configuring processor settings in virtualbox vm
  3. Next, select the Acceleration tab. This tab allows you to enable the hardware virtualization and the para-virtualization settings.enabling VTx acceleration settings in virtualbox

Configuring Display Settings in VirualBox

  1. The next section is the Display section. The Screen tab of this section allows you to set the video memory, enable the 3D acceleration, and 2D video acceleration.Configuring display setting in virtualbox vm
  2. The next tab is the Remote Display tab. This tab allows you to set the settings related to the remote connection. However, you need to download and install the compatible version of VirtualBox Extension Pack to use this feature. Installation of VirtualBox Extension Package has been covered in the later section.Configure remote display setting in virtualbox
  3. The last tab of this section is the Video Capture tab. It is pretty disappointed that the latest version of VMware Workstation no longer allows to capturing the videos of lab exercises. However, VirtualBox now supports this feature that allows you to capture the live steps in a video file. This is really helpful for the training and learning purposes. Review the video capturing options.enable video capturing in virtualbox

Configuring Storage settings in VirtualBox

  • The next section is the Storage section. Here, you can customize the settings related to the storage devices such as HDD, VHD, and CD/DVD.Configure storage in virtualbox

Enabling Audio in VirtualBox Virtual Machine

  • If you want to use the audio feature of your host machine on the VirtualBox virtual machine, select the Enable Audio check box in the Audio section.Enabling audio in virtualbox virtual machine

Configuring Network Settings in VirtualBox

  • Understanding network connection type is one of the most essential tasks for every system, server, and network administrator. The Network section allows you to attach the VirtualBox virtual machine to the desired network. Choose the network type that fulfills your requirement.configuring virtual networking in virtualbox vm

Configuring Serial Ports Settings in VirtualBox

  • The Serial Ports section displays the serial posts and their related settings. If required, select the desired settings for the serial ports.configuring serial ports in virtualbox vm

Configuring USB Devices in VirtualBox

  • The USB section allows you add and remove the USB devices to the VirtualBox virtual machine. The default supported USB version is Version 1.1. In order to use the latest version of USB devices (USB 3.0), you need to download and install VirtualBox Extension Pack.Configuring USB devices in virtualbox vm

Configuring Shared Folders in VirtualBox

  • The next section is the Shared Folders It allows you to share files between host and guest operating systems. To add a shared folder, click the add icon and select the folder of the host machine that you want to share with the selected virtual machine. Specify the folder name.  There are two more options in the Add Share dialog box that you should know: Read-only and Auto-mount.
  • Read-only: Select the Read-only option if you want to share this folder with the read-only permission.
  • Auto-mount: If you want to mount the shared folder as a network drive automatically inside the virtual machine, select the Auto-mount option.Enabling shared folders settings in virtualbox vm

Configuring User Interface Settings in VirtualBox

  • The last section is the User Interface It allows you change the settings that affect the user’s behavior and lookup of the virtual machine.Configuring user interface settings in virtualbox vm
That’s all about the configuring virtual machine settings in VirtualBox. Hope, you have got the basic idea of the virtual machine settings in VirtualBox.

Configure NIC Teaming in VMware First go to Windows Server 2012  then go to Server Manger Click on All Server then right click on your...